|
Star Overlay Setup |
  
|
|
Star Overlay Setup |
|
The 'Star Overlay' tab provides a convenient way to setup the required parameters to allow star and planet data to be overlaid onto the image. The task is to find a suitable mapping to relate an altitude and azimuth pair to a correct pixel position on the captured image. The approach of the star overlay tab is as follows:
| 1. | Take an image that will allow identification of stars visible on the image (Alternatively an existing FITS file can also be loaded for this purpose) |
| 2. | Set the visible optical circle by dragging and resizing the circle marker |
| 3. | Use an app (or your fantastic knowledge of the stars!) to identify 4 bright stars located in the 4 quadrants of the image |
| 4. | For each star, right click to mark the position, select the star name from the drop down and match the star to the location. |
| 5. | For a rough first estimate, preview the overlay with the result from the 4 matched stars |
| 6. | This will roughly overlay all star names onto the image (for all stars brighter than the magnitude cut off) |
| 7. | Now that each bright star is roughly labeled you can proceed to match more stars to fine tune the overlay (this is now much easier as the name is already displayed next to each star) |
| 8. | Once satisfied, save the settings. |
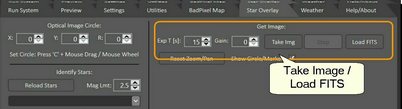
Step 1: Take Image or Load FITS file:
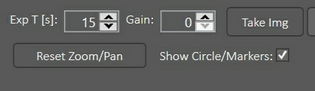
| • | Use the Exposure time and gain controls to see the required values and click the 'Take Img' button to capture the image |
| • | Alternatively click the 'Load FITS' button to load an existing FITS file |
| • | You can Pan the image by clicking and dragging the image with the left mouse button |
| • | You can Zoom the image by use of the mouse wheel |
| • | You can reset the pan and zoom by clicking the 'Reset Zoom/Pan' button |
| • | You can hide the circle (and star markers) by un-ticking the 'Show Circle/Markers' check box |
Step 2: Set the optical image circle
| • | To move position of the red circle: Hold the 'C' key pressed and click and drag the circle with the left mouse button pressed |
| • | To increase / decrease the red circle: Hold 'C' key pressed and move mouse wheel up or down to change the size |
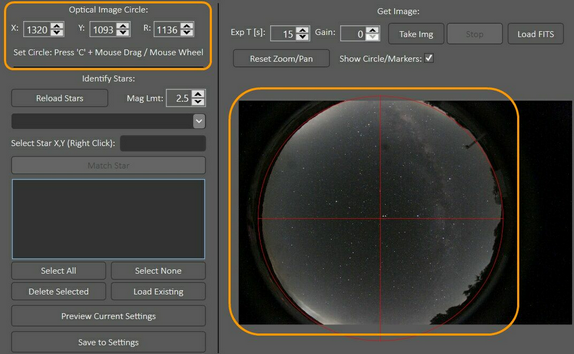
| • | Place the circle over the optical image circle you can see on the image |
| • | The app will automatically track the position and size of the circle in the top left corner of the tab |
| • | The circle only needs to be put in a rough location, high accuracy is not required |
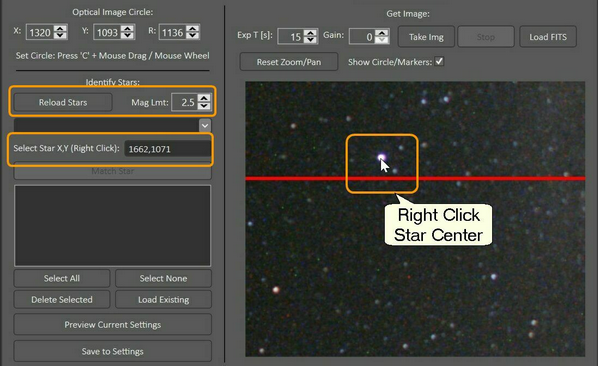
Step 3 / 4: Match at least 4 Stars in different quadrants
| • | Use and app (set the location of the camera and the time the image was taken) or your knowledge of the stars to identify a visible star in the displayed image |
| • | Use the mouse to drag and zoom (mouse wheel) the image to bring the chosen star in good view and closer. |
| • | Right click the star center in the image, the app will identify the clicked position and write the corresponding X and Y coordinated in the 'Select Star X,Y' text box on the side of the tab |
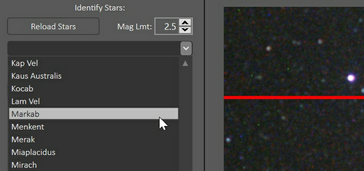
| • | Use the drop down box to select the name of the star that was right clicked |
| • | The drop down box only contains stars brighter than the selected magnitude limit. To show fainter stars in the drop down just increase the 'Mag Lmt' value and click the 'Reload Stars' button. |
| • | Please note that depending on your star catalog, not all stars will have a common name and be labeled with the constellation name and number / letter. For example the star Shedar in Cassiopeiae will is listed in the standard star catalog as '18 Alp Cas'. Your star gazing app should be able to show you these identifiers if required. |
| • | Once the correct star has been right clicked and selected in the drop down box, click the 'Match Star' button to add it to the list |
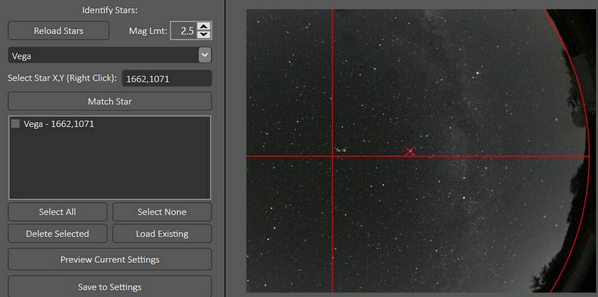
| • | Once the star is matched, a corresponding red cross will be displayed on the image |
| • | You can delete matches from the list by ticking the respective boxes for the entries to be removed and then click the 'Delete Selected' button |
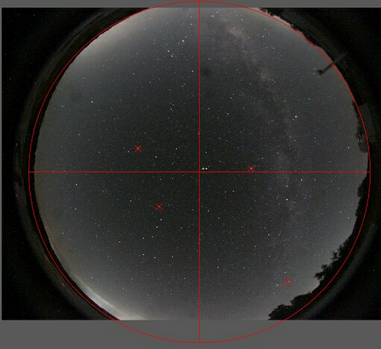
| • | Identify at least 4 stars this way. At this stage 4 is enough, fine tuning can be done once the first preview is shown. |
| • | Ensure that you include a star from each of the 4 quadrants. This will ensure that the app will be able to calculate a result from the 4 matches |
Load Existing Points: Optional!
| • | If you have already saved matched points to the settings, you can load the points and improve on them. |
| • | Click the 'Load Existing' button to load these points |
| • | Please note that the settings do not save the matched star names but only AltAz/XY pairs (and the matched stars would only be at that location for the given time and location in any case). So if you load the existing points then they will have names like: Point25.15,269.09-499,1178 |
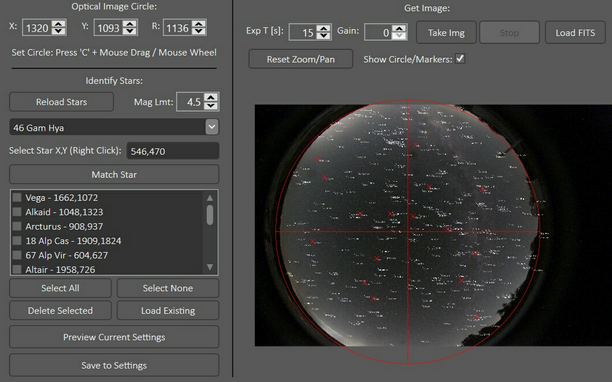
Step 5/6/7: Preview and Fine Tuning
| • | Click the 'Preview Current Settings' button to overlay a rough preview of the star overlay. This will give you the star names very close to the respective stars on the image but it won't be exact. |
| • | If you do not see enough star labels you can increase the number of overlay points by increasing the magnitude limit in the 'Mag Lmt' selection and clicking 'Preview Current Settings' again. This will then show all the star labels for stars brighter than the new set magnitude limit. |
| • | Now that the star labels are already displayed it is easy to mark that star and match it with the corresponding name in the drop down. |
| • | Now continue to match stars in different parts of the image. It is best to describe a small, medium and large circle around the image center. |
| • | If you find areas that do not match well then add a further match in that area. |
| • | After each correction you can click the 'Preview Current Settings' button to see the changes |
| • | Don't go overboard with fine tuning :-)! If you only display the star labels, the tuning does not need to be absolutely perfect |
Step 8: Save to settings
| • | Once satisfied with the result, click the 'Save to Settings' button to save the information to the settings |
| • | Done! |