|
Keogram/Stacking/Projection (PRO) |
  
|
| Show/Hide Hidden Text |
|
Keogram/Stacking/Projection (PRO) |
|
| Show/Hide Hidden Text |
Keograms, Stacked Images and Projection Images are sub-functions of the latest image function. All three images are based on the image used as the latest image and are created in the same cycle / time periods. If the latest image function is not running then these images will also NOT be created.
For shared settings and to turn these additional features on and off please see here: Latest Image Common Settings
Keograms
In AllSkEye, keogram images are composed of and created alongside 'latest images' i.e. for every 'latest image' that is being saved and/or transferred, a corresponding keogram image is saved and/or transferred.
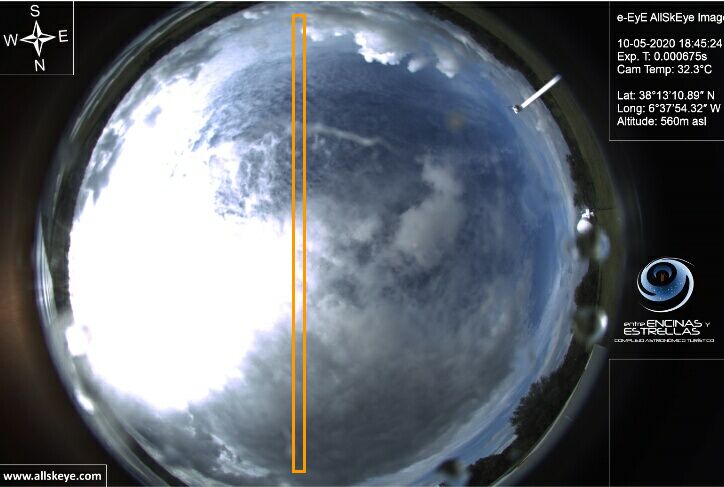
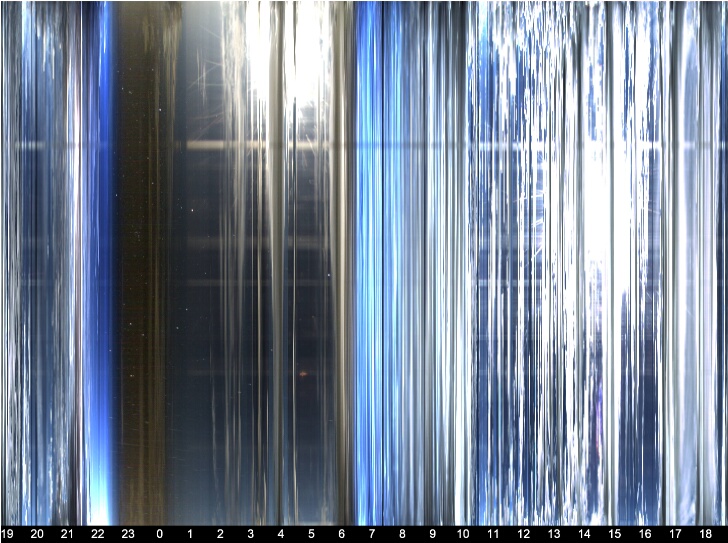
Keograms are images composed of slices taken from images in a sequential time order.The slices (which are always taken from the same location and with the same shape) are stitched together to form an image displaying a timeline of the selected part of the image.
Keogram Settings:
In common latest image settings:
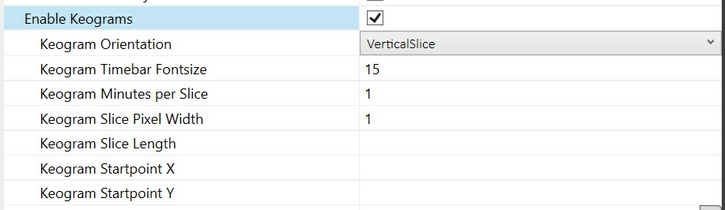
| • | Orientation: Determines if a vertical or horizontal slice should be taken from each image i.e. if vertical then the long side will be vertical and the keogram is created by stitching the slices next to each other. If horizontal then the long side of the slice is horizontal and the image slices will be stacked on top of each other. In horizontal keograms the timeline will be at the bottom, in vertical keograms on the right hand side of the image. |
| • | Timebar Font Size: The font size to use for the number in the time bar |
| • | Minutes per Slice: The number of minutes each slice should represent. |
| • | Slice Pixel width: How many pixels to take out of each image i.e. the short side of the slice in pixels (for vertical slices this will be the width of the slice, for horizontal slices the height of the slice) |
| • | Slice length: The length of the slice in pixel i.e. the long side of the slice (for vertical slices this will be the height of the slice, for horizontal slices the width of the slice). If left empty the app assumes that you want to take the entire height or width of the image. |
| • | Starpoint X: The top left X coordinate of the slice (regardless of wether the slice is vertical or horzontal). If left empty then the app assumes that you want to take a slice out of the middle of the image |
| • | Starpoint Y: The top left Y coordinate of the slice (regardless of wether the slice is vertical or horzontal). If left empty then the app assumes that you want to take a slice out of the middle of the image |
In individual latest image settings:
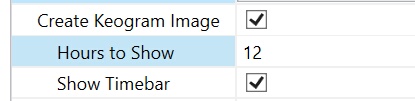
| • | Hours to show: How many hours the keogram should display i.e. if set to 12 then the keogram will show all slices created in the last 12 hours. |
| • | Show Timebar: Wether to show the hour digits on the image or not |
Slice creation Cycle / Image Size
The width (or height if a horizontal slice is configured) of the actual keogram image depends on three things:
| • | A = The number of hours to display (in individual latest image settings) |
| • | B = The 'Minutes per Slice' Setting (in common latest image settings) |
| • | C = The slice pixel width (in common latest image settings) |
The total length of the keogram part of the image in pixel is calculated by: KeogramLength = A * 60 * C / B
So for example if you display the last 12h, each slice has 4 pixels and you are showing 1 Minute with each slice the keogram part will be: 12 * 60 * 2 / 1 = 1440
Please Note: The cycle frequency of the 'Latest Images' mechanism (in seconds) i.e. how often the latest image is generated (in common latest image settings) should be chosen so that you will have a new image ready every time a new slice is generated. So if the 'Minutes per Slice' setting is set to 1 the cycle frequency of the latest image should not be more than 60s.
When the time bar option is ticked, an extra section will be added to the image to show the time line against a black background (either at the bottom for vertical slices or on the right hand side for horizontal slices). The size of this section will be auto calculated based in the set font size.
Keogram Recovery
The keogram data would normally be lost if the AllSkEye application is restarted, however there is an inbuilt mechanism to recover any available data from the last created keogram image. Please note that for this to work you need to enable the 'Save Latest Image' setting so that the latest image, as well as the keogram image, are saved in a local folder to allow the extraction.
Stacked Images
The image stacking function allows the alignment and stacking of 'latest images'. The star overlay mapping function is used to calculated the pixel shifts in the individual images which allows the pixel alignment of images. Only pixel inside the optical circle are rotated, pixel outside the image circle remain static. The stacked image will be output alongside the latest image in the same folder with the addition of '_Stacked.jpg' in the file name. Please note that the Pro version star overlay setup on the Star Overlay setup tab must be completed for the stacking to work.
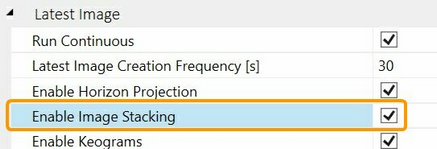
The stacking function must first be turned on in the 'latest image' common settings:
Once turned on, settings must then be set on each 'latest image individually (where required):
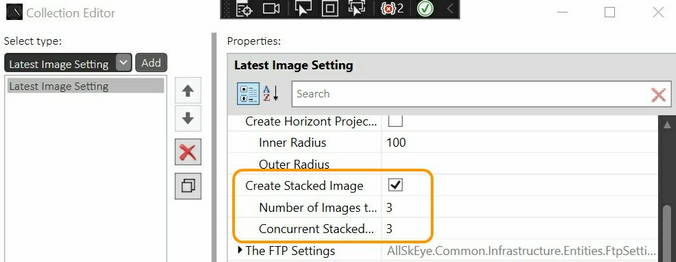
| • | Create Stacked Image: Turn on stacked image for this latest image. |
| • | Number of Images to Stack: The number of consecutive 'latest images' to stack before the stacked image is saved. |
| • | Concurrent Stacked Images: The number of stacked images that are being created at the same time. |
If for example the number of images to stack is set to 6 then the app will stack 6 consecutive latest images. Once this is complete, the stacked image will be saved alongside the latest image and the stacking starts again. The image is not updated until the next stacking cycle is completed. To increase the frequency of update on the stacked image it is possible to run multiple stacking operations at the same time. If for example the number of images to stack is set to 6 as before but if additionally the Concurrent Stacked Images is set to 3 then 3 stacked images will be created at the same time but offset by two images (e.g. Stack1 will start at image 1, Stack 2 at image 3 and Stack 3 at image 5). In effect this means that once the first stack is complete, a new stacked image will be produced on every second 'latest image' It is also possible to have the same number of images to stack and concurrent stacked images e.g. images to stack is set to 4 and concurrent stacked images is also set to 4. This means 4 stacks are running at the same time and once the first stack completes, a new stacked image is created on every latest image update. Please bear in mind though that image stacking is resource intensive and creating many concurrent image stacks will require higher computing power.
Horizon Projections
In AllSkEye horizon projection images can be output alongside latest images i.e. for every 'latest image' that is being saved and/or transferred, a corresponding horizon projection image is saved and/or transferred.
Horizon projections take the all sky image and 'dewarp' it to create an image looking towards the horizon. To achieve this the image needs to be compressed at the bottom and heavily stretched at the to so you will see image quality degrade the further up the projection goes. There are two settings that influence this behaviour and allow you to 'cut out' the worst parts:
| • | Inner Radius: In the projection image, the image center of the original image will be stretched to make up the top edge of the image or in other words the the inner radius as set here determines the circle of pixels that will be stretched to create the top edge of the image. The value can be set to 0 but then one pixel will be stretched along the entire top edge of the projected image (and not deliver any useful information). Therefore it is better to define reasonable value here to at least have some image quality at the top end of the projection image i.e. the larger the inner radius the better the quality. The downside is that anything within the circle defined by this radius will not be shown on the projection image i.e. the sky straight overhead. |
| • | Outer Radius: Similar to the inner radius, the outer radius determines the circle of pixels that will make up the bottom edge of the projected image. Here quality is not an issue as there are more than enough pixel. If this is left empty then the app will use a radius to reach the edge of the image. However if the outer radius exceeds the smaller of width or height of the image (i.e. the described circle goes outside the image rectangle) then the resulting projected image will contain black areas where no image data is present for this part. |
| • | Best Fit Option: If ticked AllSkEye will resize the output image to keep the selected max radius at unity scaling, and set the width to the circumference distance of the radius midway between max radius and min radius. This essentially tries to best preserve the Aspect Ratio of the polar image but may produce a longer and thinner image. |
Please note that you also need to tick the 'Enable Horizon Projection tick box in the 'Common Latest Image Settings' as described above otherwise the projection image will not be created, even if you enable it in the individual latest image setting!
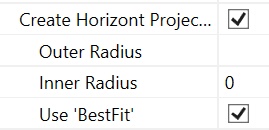
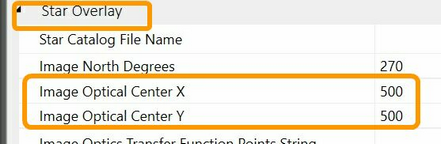
Image Optical Center:
Of course the radii detailed above need a center point in the image. from where they are drawn. The app will use the 'Optical Image Center X' and 'Optical Image Center Y' values found in the 'Star Overlay' section of the settings to determine this center point. So if you have a determined an exact optical center point of your image (the center of the camera imaging circle) then please enter the x and y values in the 'Star Overlay' optical center settings. If those values are left empty then the app will assume that the center is the center of the image.
Projection center settings (in Star Overlay settings):