|
Text Overlay |
  
|
| Show/Hide Hidden Text |
|
Text Overlay |
|
| Show/Hide Hidden Text |
The application can display a custom text on the following output images:
| • | Latest Images |
| • | Converted Images (for movie creation) |
| • | Line detection images |

These settings determine the layout and look of the displayed text:
| • | Text Template |
| • | Font Size |
| • | Text Color |
| • | Font Family |
| • | Normal / Bold |
| • | Horizontal Text Alignment e.g. left, centre, right |
| • | Text Start point x/y -> the start position of the text on the image |
Each image type mentioned above has the ability to display any number of text overlays. Each individual overlay must be defined in a text overlay settings via the pop up window:
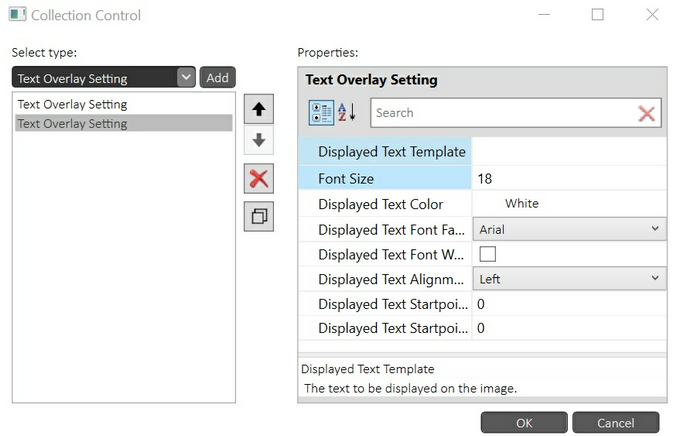
| • | The left hand side of the pop up allows the adding, copying and selecting of 'Text Overlay Settings' |
| • | The right side allows the changing of properties for the 'Text Overlay Setting' selected on the left side |
Header / Footer Space
It is also possible to add a black header and footer space to each output image (latest image, image conversions and detection images - each has separate settings). This will allow text to be displayed above or below the image and can be set by adding header and footer pixel heights to the corresponding settings sections:

Add 'Image Properties' To Text
Additionally to 'static text', which will not change during a run, it is also possible to include 'image properties' which will display image data from the image that is being displayed. These variables can be added by adding 'placeholder' words in curly brackets such as:
{SiteLatitude}
If included in the text, this placeholder for example will be replaced by the site latitude value set within the settings. Any number of placeholders can be added to the text. For example:
Lat: {SiteLatitude} Long: {SiteLongitude} Time: {ObservationDateTime} Exp.[s]: {ExposureTime}
This text will provide an image as shown here:

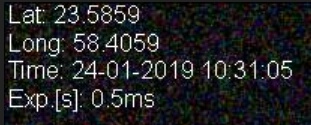
Please note that it is possible to place the text on multiple lines by inserting a {cr} placeholder. For example the same text can be fomratted as:
Lat: {SiteLatitude}{cr}Long: {SiteLongitude}{cr}Time: {ObservationDateTime}{cr}Exp.[s]: {ExposureTime}
Which will produce the following output:
For a full list of available properties and their respective placeholders please see separate section below (Available Text Placeholders).
Date/Time Formatting
(Please note that it is now also possible to add property formatting to each individual placeholder, which is described in the following section. Any such individual formatting, if present, will override any date/time formatting described in this section.)
Date/Time information displayed on output images can be formatted as required by setting the 'Date/Time Format String' setting. For example to show a 'day-month-year hour:minute:second' format you can enter:
dd-MM-yyyy hh:mm:ss (or dd-MM-yyyy HH:mm:ss for 24h time format)
Letters correspond as follows:
| • | d -> Day |
| • | M -> Month |
| • | y -> Year |
| • | h -> Hour |
| • | H -> Hour in 24h format |
| • | m -> Minute |
| • | s -> second |
| • | f -> millisecond |
You can use separators (e.g. - or :) between parts as required. For more information you can have a look here: Custom Date and Time Format Strings
If a placeholder is added with only the name of the property in curly brackets, e.g.
{SiteLatitude},
then the property will be added to the text as found in the image e.g. with all the decimal places. If a user wants to apply a specific format, for example to restrict the number of decimal places to one, a second value can be added to the placeholder to describe how the property should be formatted. This must be done inside the curly brackets, separated by a comma:
{SiteLatitude,0.0}
Similarly a date/time value can be formatted in the same way (although it is possible to use the general setting which will format all date/time values in the text, as described in the previous section):
{ObservationDateTime,dd-MM-yyyy HH:mm:ss}
The formatting (second) part of the placeholder needs to be in accordance with the .NET framework formatting rules.Basic date/time formatting is described in the previous section. For numerical values basic letter usage is a follows:
| • | 0 -> If you put a 0 in the format string then this will be either be replaced by the appropriate number of the value that is being display or, if the value does not have a number for this, a 0. For example if you enter 0.00 then a value of 1.2345 will be shown as 1.23. A value of 1.2 however will be shown as 1.20. |
| • | # -> If you put a # in the format string this will replaced by the appropriate number of the value or, if not present in the value, omitted. For example if you enter #.## then a value of 1.2345 will be shown as 1.23. A value of 1.2 however will be shown as 1.2. |
| • | . -> the decimal point denotes the decimal position in the format i.e. anything in front is whole numbers, anything after is decimals |
| • | , -> the comma |
You can find full details on what to put there here:
| • | Formatting numerical Values: https://docs.microsoft.com/en-us/dotnet/standard/base-types/custom-date-and-time-format-strings |
| • | Formatting Date/Time Values: https://docs.microsoft.com/en-us/dotnet/standard/base-types/custom-numeric-format-strings |
It is also possible to add a conversion formula to the property placeholder to affect a numerical conversion of the original value (e.g. to display a temperature supplied in Celsius as Fahrenheit or a wind speed supplied in mph as kts etc.). Please note that this will only work for numerical values.
This function can be achieved by supplying the property name in square brackets inside the required formula. For example to convert a temperature in Celsius to Fahrenheit the following placeholder must be used:
{([Temperature]*9/5)+32}
Or to convert wind speed in kilometers per hour into knots:
{[WindSpeed]/1.852}
This function can of course also be used in conjunction with the formatting function described in the previous section:
{([Temperature]*9/5)+32,0.0}
The following placeholders are available. Please note that if a value is not available a 'N/A' text will be inserted instead of the value.
Insert 'Carriage Return' or 'Tab':
| • | {cr} |
| • | {tab} |
Image Property Placeholders:
| • | {ObservationDateTime} |
| • | {UtcObservationDateTime} |
| • | {ExposureTime} |
| • | {SiteLatitude} |
| • | {SiteLongitude} |
| • | {CameraName} |
| • | {ObservedObject} |
| • | {Creator} |
| • | {Telescope} |
| • | {Filter} |
| • | {Observer} |
| • | {ImageCentreRa} |
| • | {ImageCentreDec} |
| • | {BitsPerPixel} |
| • | {ImageHeight} |
| • | {ImageWidth} |
| • | {PixelHeight} |
| • | {PixelWidth} |
| • | {JulianDay} |
| • | {CameraTemperature} |
| • | {Gain} |
| • | {SunriseDateTime} |
| • | {SunsetDateTime} |
Weather / Observation Conditions Placeholders:
| • | {CreationDateTime} |
| • | {AveragePeriod} |
| • | {Description} |
| • | {CloudCover} |
| • | {DewPoint} |
| • | {Humidity} |
| • | {Pressure} |
| • | {RainRate} |
| • | {SkyBrightness} |
| • | {SkyQuality} |
| • | {SkyTemperature} |
| • | {StarFWHM} |
| • | {Temperature} |
| • | {WindDirection} |
| • | {WindDirectionCardinal} e.g. N, NE, E etc. |
| • | {WindGust} |
| • | {WindSpeed} |
| • | {Weather} |