|
Triggers |
  
|
| Show/Hide Hidden Text |
|
Triggers |
|
| Show/Hide Hidden Text |
The trigger mechanism has been created to allow the user to set triggers which will automatically activate a process when certain conditions are met. At predefined regular intervals the trigger mechanism checks all active triggers and evaluates if a trigger action should be activated. In basic terms the mechanism:
| 1. | Fetches the required input data (e.g. times, weather data, etc.) |
| 2. | Evaluates the entered trigger condition |
| 3. | Depending on whether the evaluation results in a 'Condition is True' or 'Condition is False' outcome, the mechanism launches an external process (e.g. a script or application) as defined in the settings. Different actions can be defined for 'True' and 'False' outcomes (although you don't need to specify both if not required) |
For example a trigger can be set to activate:
| • | At a specified time each day e.g. every day at midday |
| • | At a certain fixed interval |
| • | At Sunset or sunrise (or a time offset from sunrise and sunset) e.g. every day 30 minutes after sunset |
| • | When certain weather conditions have been met e.g. when the outside temperature is below 5 degrees |
Input Variables
When creating trigger conditions the following variables can be use:
| • | LocalTimeOfDayMinutes (the time of day in minutes from midnight e.g. 18:30 would be returned as 1110) |
| • | UtcTimeOfDayMinutes (the time of day in minutes from UTC midnight) |
| • | SunriseTimeOfDayMinutes (the number of minutes from midnight when sunrise will occur e.g. a sunrise time of 06:30 would be returned as 390) |
| • | SunsetTimeOfDayMinutes (the number of minutes from midnight when sunset will occur) |
| • | LastTriggerEvaluationResult (the result of the previous trigger evaluation) |
| • | SecondsSinceLastTriggerActivation (the number of seconds since the last time a trigger was activated) |
| • | CloudCover |
| • | DewPoint |
| • | Humidity |
| • | Pressure |
| • | RainRate |
| • | SkyBrightness |
| • | SkyQuality |
| • | SkyTemperature |
| • | StarFWHM |
| • | Temperature |
| • | WindDirection |
| • | WindGust |
| • | WindSpeed |
| • | ExposureTime |
| • | ImageCentreRa |
| • | ImageCentreDec |
| • | CameraTemperature |
All weather related data will be returned as defined here: https://ascom-standards.org/Help/Platform/html/T_ASCOM_DeviceInterface_IObservingConditions.htm
Additional Variables read from text file:
Trigger Conditions
Trigger conditions are the 'formulas' that are evaluated to see if a certain trigger currently evaluates to 'True' or 'False' (determining which action should be carried out). These conditions use standard mathematical notation and can use the input variables as defined in the previous sections. The following format must be used:
| • | Any variables (as defined above) used must be surrounded by square brackets |
| • | The condition must be in form of a Boolean expression which, when evaluated, will give a result of 'True' or 'False' |
Trigger Expression Examples:
| • | Temperature colder than 5C: [Temperature] < 5.0 |
| • | Current local time 30 minutes after sunset: [LocalTimeOfDayMinutes] > ([SunsetTimeOfDayMinutes] + 30.0) |
| • | Humidity greater than 80% OR Temperature less than 5C: [Humidity] > 80.0 OR [Temperature] < 5.0 |
| • | Heater with Hysteresis: Turn 'On' when temperature drops to below 5 degrees, turn off when temperature reaches 7 degrees or more again: ([LastTriggerEvaluationResult] = false AND [Temperature] < 5.0) OR ([LastTriggerEvaluationResult] = true AND [Temperature] < 7.0) |
| • | Trigger an action at regular intervals e.g. trigger an action every hour: [SecondsSinceLastTriggerActivation] > 3600 |
As you might have noticed in some of the above equations have numbers shown as decimals e.g. 5.0 instead of just 5. If you only use 5 then the evaluation will only consider whole number i.e. [Temperature] < 5 would only evaluate to 'True' if [Temperature] rounds to 4 e.g. 4.4 but not if the temperature was 4.9. To make the evaluation consider decimals you have to write [Temperature] < 5.0 in which case a temperature of 4.9 will trigger true.
For a full list of all available operators and functions please see the appropriate section below.
Equality Operator (=)
Please note that for most purposes it is NOT advisable to use '=' (i.e. the 'equality' operator) in conditions. For example do not use a condition like this: [LocalTimeOfDayMinutes] = [SunsetTimeOfDayMinutes] to set a trigger to activate at sunset. Unless you are lucky this trigger might never activate as it is no guaranteed that the evaluation will happen at exactly the moment the two values are the same. The same applies to numeric values (e.g. weather observations) so again it's not advisable to set a condition of: [Temperature] = 5 to trigger when the temperature reaches 5 degrees. These values are returned as decimal values and it is very unlikely that they will be equal to a pre-set value. Instead us 'Greater than' or 'Less than' operators to trigger your actions e.g. [LocalTimeOfDayMinutes] > [SunsetTimeOfDayMinutes]. This will trigger the first time the triggers are evaluated after sunset. As this condition will evaluate to 'True' for the rest of the day you might think this is not ideal. However there is another mechanism (explained in the following section) which deals with this.
Trigger Repeat Type
The 'trigger repeat type' setting determines if the trigger should be activated again even if the trigger evaluation result has not changed:
| • | Always: The trigger action will always be carried out (on every trigger evaluation) regardless of wether the previous evaluation result was the same as the current one. For example if the trigger condition checks for temperature e.g. [Temperature] < 5 and the 'trigger checking cycle' is set to check all triggers every 30s, then the 'True' trigger action will be carried out every 30s whenever the temperature falls below 5 degrees. |
| • | Change: If set to 'Change' the trigger action will only be carried out if the trigger condition evaluates to a different result copared to the previous result i.e. the trigger will only activate on a 'True' result if the previous result was 'False' and vice versa. To take the previous example trigger condition ([Temperature] < 5 ), if the temperature falls below 5 degrees, the 'True' trigger action will be carried out only once, but not subsequent times, even though the temperature is still below 5 degrees and the condition evaluates to 'True' (because there was not 'change' in the evaluation). Only once the trigger registers that the temperature has risen above 5 degrees and the evaluation result is 'False' can the 'True' action be triggered again by a subsequent temperature drop to below 5 degrees. |
Please note that for trigger repeat type 'Change' there is an additional option called 'Force change on first run'. If this is ticked (which is the default setting) the the first time the trigger is evaluated it will assume ' a change'. This means that the true or false action will be executed depending on the evaluation outcome.
Trigger Interval [s]
The trigger interval can be used to 'block' any trigger evaluation from being carried out until the set number of seconds have passed. This can be used to prevent the trigger from being activated many times in a short space of time when a variable hovers closely to a threshold value. For example if the condition is set to: [Temperature] < 5 and the temperature fluctuates around 5 degrees this could lead to the triggers repeatedly being activated. If the trigger interval (for example) is set to 600 seconds then that trigger will not be evaluated again in that period. This can for example be useful if you switch on a heater where you want the heater to run for a minimum period once it has been triggered.
Trigger Actions
The trigger settings allow the user to define two actions:
| • | An action to be carried out when the evaluation returns a 'True' result |
| • | An action to be carried out when the evaluation returns a 'False' result |
Please note that you Do NOT have to specify both action, for many cases (like time related triggers) usually only the 'True' action is required e.g. carry out the action when the time goes past sunset.
Action Mechanism
Trigger actions take the form of launching a Windows Process i.e. this mechanism can execute a script, bat file or executable program. Two pieces of information are required for this:
| • | The file name: The full file name of the script, bat file or executable to be launched. Usually this must include the full path, file name and extension (unless the program has been registered in the Windows environment variables, for example the Windows Notepad application can be launched without the need to enter the path to it or it's extension). |
| • | The startup arguments: Any (optional) arguments that should be passed to the process that is being launched |
Please Note:
Once the process has been launched, AllSkEye no longer has any connection with it and can no longer control it i.e. it cannot terminate the process or make it available again for further use!
Import Additional Parameters: ReadFile Action
AllSkEye has the ability to read parameters from a text file which can then be used inside the application. These external parameters need to be supplied in form of a text file with the following format:
ParameterName1=ParameterValue1
ParameterName2=ParameterValue2
ParameterName3=ParameterValue3
...
You can add as many parameters as required.A short sample:
test=Hello
x=3
y=12
Here the app will read in three parameters, test,x and y with the associated values of Hello, 3 and 12. Now these values can be used:
| • | In the image overlay text |
| • | Inside other trigger epxressions |
| • | The parameters will also be saved in the FITS header (if original image archiving is turned on) |
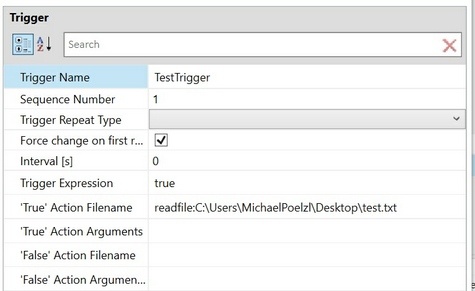
The ReadFile Action must be setup in the following way:
| • | Setup your trigger as normal |
| • | If you want to run this data import on every trigger cycle just enter 'true' in the Trigger Expression field |
| • | In the 'True' Action Filename filed you need to enter the text file that should be read. But importantly you need to prefix it with: readfile: |
Sample:
ReadFile Text Encoding:
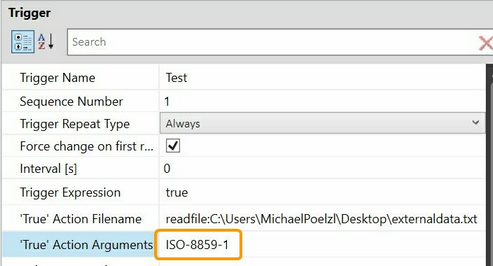
Text files can have different encodings which affect how characters are displayed. This is especially noticeable for special characters which might be displayed incorrectly if the wrong encoding is used. By default AllSkEye will use the UTF-8 encoding for reading text files. If you find that this produces incorrect characters when additional data is overlaid onto the image then you need to find out which encoding is used in your text file and then tell AllSkEye which encoding it is by specifying it in the Action Arguments setting.
For example if your text is encoded in ISO-8859-1 then you need to set this in the Action Argument settings:
A full list of encoding names can be found here: List of Encodings
Trigger Settings
The trigger settings section on the settings tab allows the user to define how often triggers should be checked as well as manage the triggers themselves:

| • | Trigger Management Cycle [s]: The interval in which triggers are evaluated e.g. if set to 30 seconds, all triggers will be evaluated every 30 seconds. |
| • | Triggers: To setup triggers please click the drop down button on the right of the 'Triggers' line. |
Please note that opening the 'Triggers' edit panel can be very slow! Sometimes a few seconds pass until the 'Triggers' edit panel is shown. Please be patient!
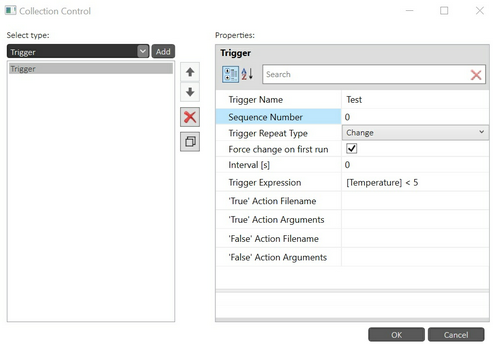
Triggers Edit Panel
The triggers edit panel allows the creation of any number of triggers. The triggers are displayed as individual lines inside the left hand list. To edit a trigger highlight the entry in the list and use the edit panel on the right to change the values:
On the left hand side you can:
| • | Add a new trigger by clicking the 'Add' button |
| • | Move triggers up and down to reorder them - Please note that this will not change the order the triggers are evaluated. This evaluation order is determined by the 'Sequence Number' set for each trigger. |
| • | Delete a trigger |
| • | Copy a trigger |
Once you have selected a trigger in the list you can then edit it in the right panel:
| • | Trigger Name: The name of the trigger. This will be used in trigger logging to allow you to identify entries for this trigger in the log. |
| • | Sequence Number: Defines in which order the trigger will be evaluated. Triggers will be evaluated in ascending order according to this number. |
| • | Trigger repeat type: As explained above |
| • | Force change on first run: Only for trigger repeat type 'Changed'. If ticked the first time the trigger is evaluated the application will assume a change and carry out the false or true action as appropriate. |
| • | Interval: As explained above |
| • | Trigger Expression: As explained above |
| • | 'True' Action Filename: The full file name of the script, bat file or program to execute when the trigger evaluates to 'True'. |
| • | 'True' Action Arguments: Any arguments that should be passed to the file being executed when the trigger evaluates to 'True' |
| • | 'False' Action Filename: The full file name of the script, bat file or program to execute when the trigger evaluates to 'False' |
| • | 'False' Action Arguments: Any arguments that should be passed to the file being executed when the trigger evaluates to 'False' |
PLEASE NOTE:
Any changes you make on this entire panel will only be saved if you click the 'OK' button on the panel. If you click 'Cancel' or the cross in the top right corner ALL changes you've made since opening it will be lost! Also please remember that any the changes will only be saved to the settings file when you click the 'Save Changes' button on the main settings tab!
Trigger Logging
All trigger related actions are logged in a separated log file within the logging folder. For normal logging only trigger activations will be logged. If you require more detailed information for troubleshooting please enable 'verbose' logging in the logging settings.
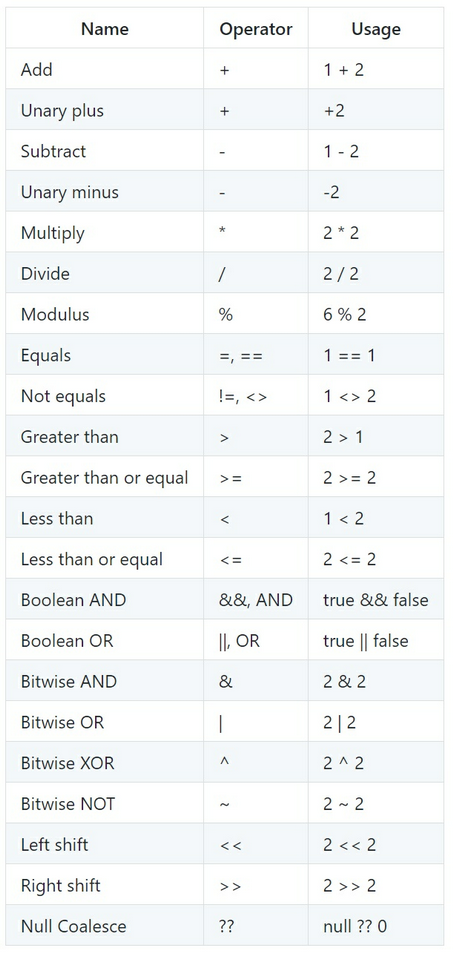
Trigger Operators
The trigger evaluations can use the following operators: