|
Auto Exposure Time |
  
|
| Show/Hide Hidden Text |
|
Auto Exposure Time |
|
| Show/Hide Hidden Text |
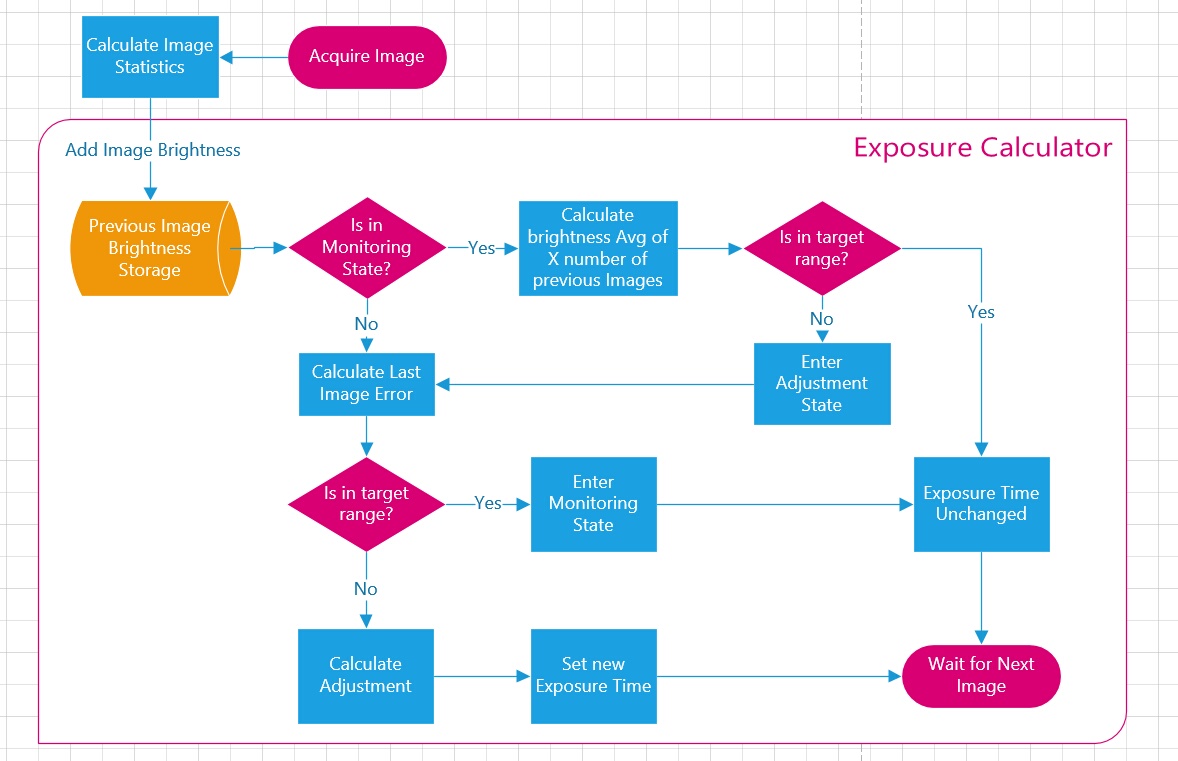
The auto exposure time function can automatically set an appropriate exposure time to achieve a preset brightness value of the image. Specifically the image 'Median Value' is used for this purpose. The user can set an appropriate image median value target and the application will try to achieve this setting within the given parameters.
Please note that this process is reactive i.e. the most recent image is evaluated and if required a change is applied to the exposure time. This change is then validated when the next image comes in and further, more refined, adjustments are made (if required) for each subsequent image until the target is met. This process can be quick with short exposure times but can take a while with longer exposure times as the process needs to wait for subsequent images to come in. The entire process is described in the following diagram:
The settings are as follows (advanced settings in yellow):
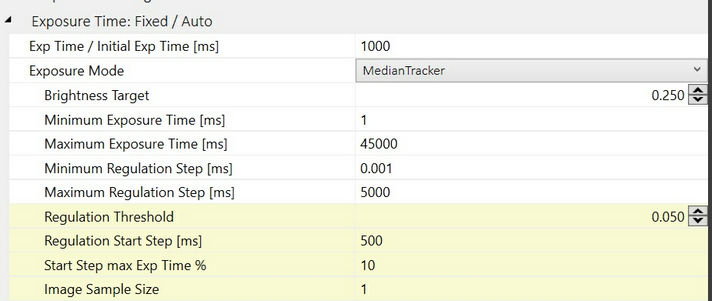
The import parameters in this calculation are:
| • | Median Tracker Target [0..1]: The normalized median value the auto exposure calculator is trying to achieve (where 0 is black and 1 is white). Around 0.3 seems to be a good starting point. |
| • | Min/Max Exposure Time [ms]: Regardless of the calculated values the exposure time will not be set lower or higher than these two values. |
| • | Regulation Threshold: The minimum difference between the desired image median value and the actual value to trigger an exposure time change. i.e. the range +/- from the set target in which the target will be seen as satisfied. If set too large the exposure time will not change fast enough to keep the image at a reasonably constant level. If set too small the calculator will constantly 'hunt' for the best exposure time and not settle down. |
| • | Regulation Start Step [ms]: The initial adjustment applied to the exposure time when a change needs to be made (because the actual value is too far from the median target). This is a first step 'in the right direction' but will most certainly not yield the correct result. The returned brightness value from the next image will be used to judge how the image has changed after this adjustment and a new (better) adjustment is made based on this information. If set to large the initial adjustment will be too large and overshoot the target. If set too low it will take longer to reach the target. Generally a lower value is preferred as it prevent large oscillations from occurring. |
| • | Min/Max Regulation Step [ms]: These min/max values will limit the calculated adjustment made to the set values. |
| • | Image Sample Size: The image sample size determines how many images are taken into account to calculate the actual median valueto compare against the set target. For example if set to 3, the actual median value is taken as the average of the median values of the last three images. This has the advantage that a short term change (such as an artificial light shining onto the camera) won't trigger an immediate large change in exposure time. The disadvantage is that it will take longer for the exposure time to react to a change in brightness. Two is generally a good value, however for daytime operations where changes in brightness are happening very quick a value of 1 is probably better. |
Pixel Saturation Control
Additionally the exposure calculation can reduce the exposure time to avoid excessive pixel saturation (pixels at full or near max value). This can be useful to avoid over exposure during daylight hours. This mechanism works by determining the number of saturated pixel and reducing the exposure time further to bring this number below a certain threshold. The relevant settings are:
![]()
| • | Pixel Saturation Cutoff %: Determines at which point a pixel is deemed as saturated. A value of 100% would mean any pixel at max value would be classed as saturated. If a value of 80% is set then any pixel brighter than 80% of max value will be classed as saturated. |
| • | Pixel Saturation Area Lower Limit %: This is expressed as a percentage of the image area. If all saturated pixel combined exceed this percentage of the image area then as a first measure the exposure calculation will stop increasing the exposure time. |
| • | Pixel Saturation Area Upper Limit %: This is expressed as a percentage of the image area. If all saturated pixel combined exceed this percentage of the image area then as a second measure the exposure calculation will start decreasing the exposure time to bring the number of saturated pixel below this threshold. |
| • | Pixel Saturation Adjustment %: The maximum adjustment the pixel saturation mechanism can make to the current exposure time in percent. I.e. if set to 10% then the mechanism can only reduce the current exposure time by a max of 10% of the current exposure time. |
Active Image Area
Normally the entire image will be taken to calculate image statistics which in turn drive the auto exposure calculation. It is however possible to define an 'Active Image Area' which limits the calculations to a pre defined area. This can be useful for 180 degree cameras where only the center part of the camera sensor is used to accommodate the all sky image resulting in large black areas towards the sides. The active image area can be set in the Acquisition Settings - Additional' area of the application settings:
Circular Mask:
To define a circular mask use the following settings:
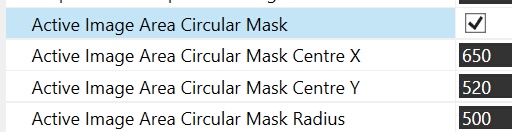
To check the active image area circle on an actual image you can take a preview image with the 'Show Active Image Area' tick box ticked. This will show a green circle defining the set area (see here for details).
Mask File:
The active image area can also be defined by use of a 'mask image file'. The mask file is an image file where any areas that are completely black will be seen as OUTSIDE the active image area. You can create such a file in a simple paint program and mark all areas that you do not want to include in the active image area in black colour. Once created you can set the following settings to load the mask file into AllSkEye:
![]()