|
Image Acquisition |
  
|
| Show/Hide Hidden Text |
|
Image Acquisition |
|
| Show/Hide Hidden Text |
The 'Image acquisition' module is responsible for:
| • | Connecting to the Camera |
| • | Taking Images at the correct times of the day |
| • | Calculating the required exposure times |
| • | Expose the image and read the data from the camera |
| • | Subtract a dark frame / Apply bad pixel map repairs |
| • | Create the image preview |
| • | Create the 'Latest Image' jpg file and save/ftp |
| • | Fetch Weather Information (if available) |
| • | Create the correct FITS header keywords and save the image data as a correctly formed FITS file |
Image Acquisition Panel
The image acquisition panel has the following layout:
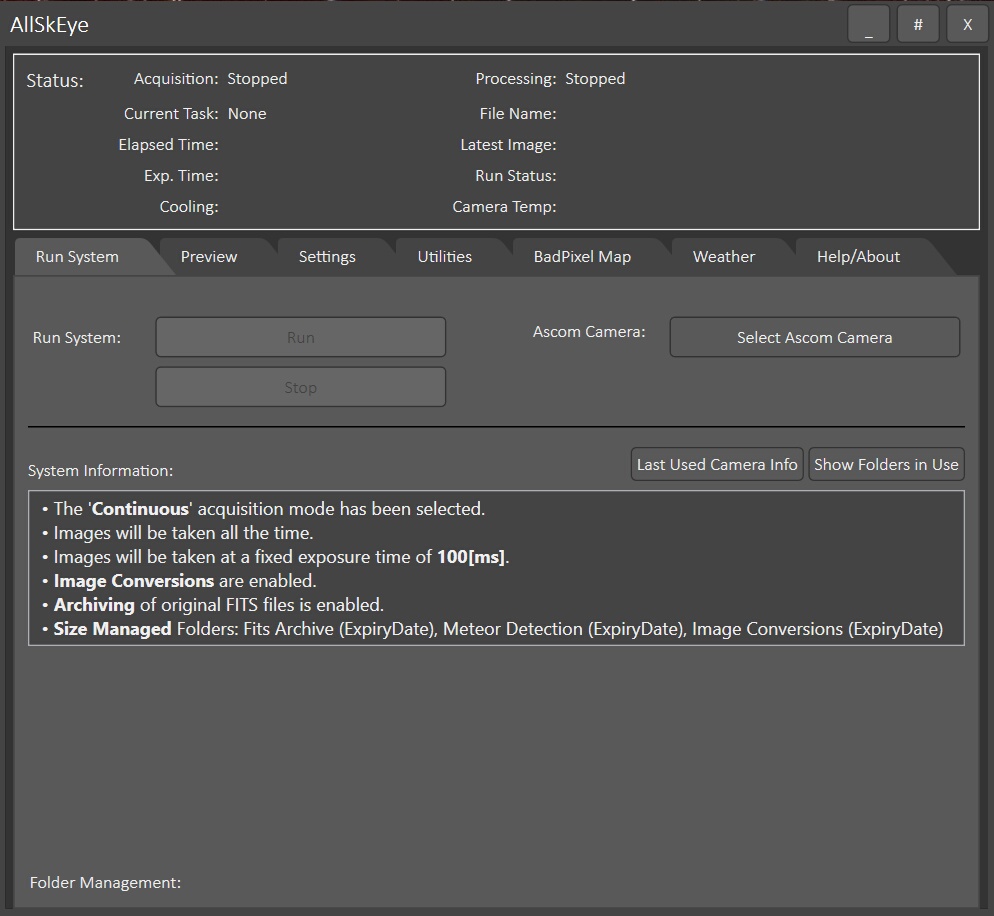
Image Acquisition Panel
Basic settings are displayed inside the 'System Information' panel. To run/stop the system click the corresponding buttons. This will start both the acquisition and image processing loops.
Connecting a Camera
The camera type to be used (i.e. SX, ZWO, Altair, QHY, ASCOM etc.) must be set within the camera settings. Once save the 'Run System' tab will display the corresponding control to select the connected camera and if required set additional settings:
| • | SX Cameras: No additional settings |
| • | ASI ZWO: Has separate section in settings tab |
| • | Altair Astro: Has separate section in settings tab |
| • | QHY: Has separate section in settings tab. |
| • | INDIGO: Must select image output format in dropdown after camera selection |
| • | ASCOM: Must setup camera properties in ASCOM camera chooser after selecting camera |
| • | RawFileReader (PRO): Has separate section in settings tab |
Acquisition Modes
The following acquisition modes are available:
| • | Night Time: Acquires images based on local sunset/sunrise times (with offsets if required) |
| • | Fixed Times: Acquires images images on fixed times e.g. between 18:00 and 06:00 every day |
| • | Continuous: Continuously takes images 24/7 |
| • | NoAcquisitions: Will take no acquisitions i.e. only the processing loop will be active. The latest image function will not operate. |
Night Time Mode:
Night time mode requires the camera location to be set and calculates actual sunrise and sunset time for the camera latitude and longitude. Acquisition start/end can be further adjusted by providing adjustment minutes' e.g. start 30 minutes after sunset and stop 30 minutes before sunrise.
Acquisition Pause (Advanced Setting)
In general images will be acquired from a certain time in the evening to a certain time in the morning (unless continuous imaging is selected). It is possible to add a 'Pause' to these acquisition times in case imaging is not required for a certain part of the night. For example if you would like to image from 18:00 to 08:00 in the morning but not take any images from 23:30 to 04:30 then you can set the acquisition pause minutes to:
| • | Pause Start Minutes: 23 * 60 + 30 = 1410 |
| • | Pause End Minutes: 04 * 60 + 30 = 270 |

Within the 'Image Acquisition' settings it is possible to define the length of a pause or interval which will be applied in between each acquisition.

The behaviour is as follows:
| • | If 'Fixed Interval Mode' is ticked -> An image will be taken every time the set number of milliseconds have elapsed regardless of exposure time (e.g. if 60000 is set an image will be exposed every minute). Please note that for this to work the maximum exposure time must be less than the set interval. |
| • | If 'Fixed Interval Mode' is un-ticked -> The acquisition will pause for the exact number of milliseconds between the end of the last exposure and the beginning of the next. |
Please note that if 'Median Tracker' exposure mode has been selected the pause / interval settings will initially be ignored until the system has reached the desired median target the first time. This will ensure that the correct exposure time is reached as soon as possible.
Exposure Modes
The following exposure time modes are available:
| • | Fixed Time: Exposes each image for the same number of milliseconds |
| • | Median Tracker: Calculates the exposure time to try to achieve a preset image 'median' brightness value. Click here for full details. |
When setting median tracker settings please read the descriptions at the bottom of the settings edit panel for details on what needs to be set. When deciding what median value to track you can use the image preview tab which displays image statistics at the right hand side of the image (please ensure that no clip/stretch is applied as this will also be reflected in the statistics).
Camera Binning (Advanced Setting)
Acquisition settings allow the camera to be run in different binning modes by selecting the camera binning factor.The setting is interpreted as follows:
| • | 1 = 1x1 |
| • | 2 = 2x2 |
| • | etc. |
Asymmetric binning is not supported, A binning factor of 2 will combine 4 adjacent pixels into one 'super pixel' and thereby increasing sensitivity (i.e. i.e. the 'super pixel' will show the brightness of all four pixels combined). The resulting image file will have a quarter of the resolution of a file created with 1x1 binning and roughly a quarter of the file size.
INDIGO Cameras: Please note that this setting will be ignored for INDIGO cameras. To use binning with INDIGO cameras you need to select the corresponding image output format after selecting the camera. This will usually include binning option if available.
Gain
Camera gain can be set for day and night captures if the camera supports it. Please see here for full details.
Dark Frame Subtraction / Bad Pixel Map Repairs
Acquired images can be improved by applying dark frame subtraction or hot/cold pixel repairs by use of an existing bad pixel map. Please note that use of both methods at the same time has not been tested and might produce undesired results.
To activate either feature the dark frame / bad pixel map file path must be entered in the acquisition settings:
![]()
Creation:
Please see here for details on dark frame and bad pixel map creation: BadPixelMap / Dark Frame Creation
Subframe Capture
It is possible to only capture a part of the available sensor area when acquiring images. This can be set in the 'Acquisition Settings - Additional' area of the settings window. Here you need to specify the top left corner coordinates for the subframe to capture as well as the width and height of the frame in pixels:
Please see here for full details: Subframe Capture
FITS Files / Keywords
FITS header keywords are created as per FITS standard specifications.
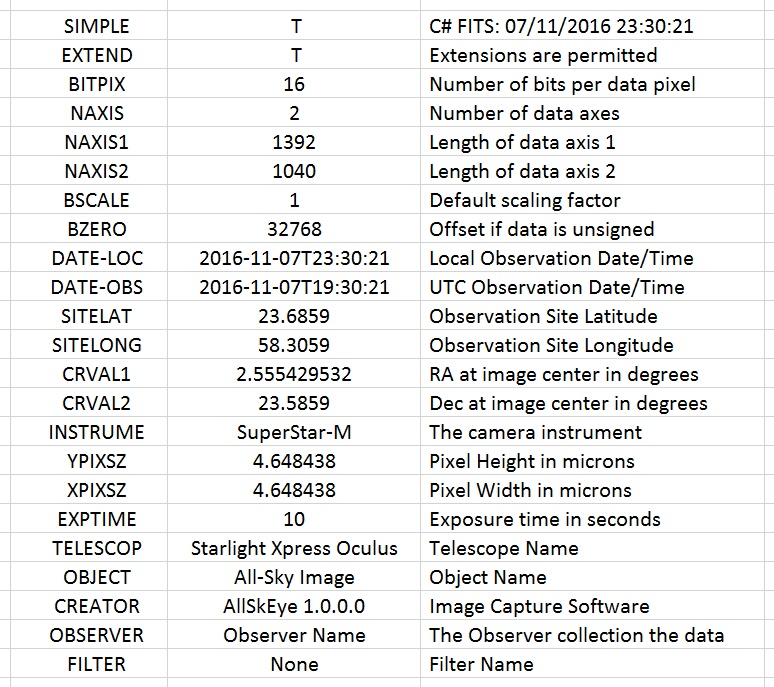
FITS Header Example
Please Note:
| • | DATE-LOC contains the local time of the image acquisition |
| • | DATE-OBS contains the UTC time of the image acquisition |
| • | CRVAL1 and CRVAL2 are set by calculating the zenith RA and DEC of the observation location at the observation date/time. Values are only correct if the camera is actually pointing exactly to the zenith. |
| • | TELESCOP, FILTER, OBJECT and OBSERVER values can be set within the settings |